Showing posts with label tutorials. Show all posts

Wednesday, July 20, 2016

creating a bold glitter eye makeup look.


It was time to do something different. To push myself creatively. It had been a long time since I locked myself away with my makeup products. Not because I was going out. Not because I was filming a YouTube video. But because I wanted to express myself.  That is exactly what I did a few weeks back. I had the apartment to myself and a massive list of things to get done. In the middle of writing yet another article...I got up. I walked to the bathroom. I took out a few products. And then I started to put together a makeup look. Honestly? At the end of it? I was stunned by what I had created. It was so different to my normal makeup looks. It was bold. It was dramatic. It was colourful. Most of all? It was a lot of fun to do. By the end of the process, I was in a better mood. I felt lighter. Happier. Which is why I wanted to do a post about the creative process.

What I Used: 
  • Jem and the Holograms by Sephora Truly Outrageous Eyeshadow Palette (Shades: 1980s, Rio, Hologram, Stinger, and Raya). 
  • Princessa Eyeshadow Pearl Powder in MG5
  • Hard Candy Walk The Line Liquid Eyeliner in Black
  • Kat Von D Studded Kiss Lipstick in Poe
  • Cover Girl Lip Lava
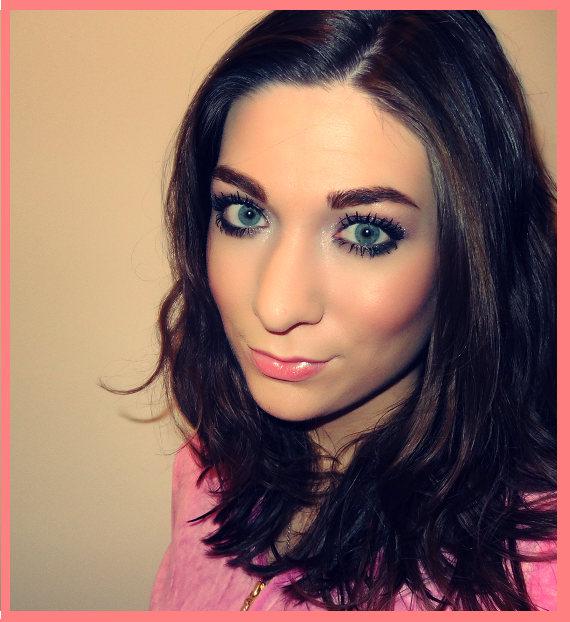
The Finished Makeup Look: 

How I Did It:
  • I started by priming my eyelids and face. Then I went through my everyday foundation routine.
  • The eyes were first. 1980s (the purple shade) was applied all over my eyelids. Rio (the turquoise) was applied on top and into the corners. Then it was blended out with Stinger (the shimmery brown shade). Hologram (the silver) was applied to the inner corner and Raya (the shimmery rose shade) was applied underneath the brow bone. I tried to create an elongated look that was a little more dramatic than a regular day-to-day style.
  • The Princessa glitter was applied over top. I used a dab of clear lip gloss to make sure the surface was tacky enough to hold the product. Then I used a flat brush to apply lots and lots of glitter to the center of the eyelid. 
  • Next up was the eyeliner. I created a long cat-eye wing and applied a coat of mascara. Then I added on some false lashes (the Ardell lash accents) for an extra pop of drama.
  • After following my foundation routine as usual - and opting for a bronzed cheek - I began to work on the lips. Poe is an underused lipstick colour that I love. So it was a pretty clear winner. I applied the midnight blue lipstick and then dotted a small amount of the Liquid Lava (a gorgeous golden gloss) just to the very center of the lips. 
That was it! The bold glitter eye makeup look was complete. It was dramatic, a little out there, and a whole lot of fun to create. I haven't had that much fun with makeup in a while. It was definitely a exciting experience.

Another dramatic makeup look I created recently? A Kardashian inspired look using the Kylie Lip Kit in Dolce K. I posted a video on my YouTube channel showing off the look - and letting you all know what I thought of the  popular lip kit.


Bold makeup looks are easily my favourite thing right now. What do you think of these?

xo Shannon

Wednesday, April 13, 2016

YouTube: Khloe Kardashian Inspired Makeup Tutorial


Inspiration comes from many places. Nature, runway shows, magazines, and a million other sources. For me? One constant source of inspiration? Khloe Kardashian. Whether I am double tapping on her Instagram page, checking out her app, or watching her on TV....Khloe makes me want to elevate my style. Which is exactly what I decided to do.

It was a beautiful Saturday morning. I had the apartment all to myself. I started searching for Khloe pictures that highlighted her signature makeup style. You know, glamorous smokey eyes, lots of lashes, highlight and contour, and a plum pout. It made me want to create. Just for the fun of it. There was no where to go and no one to see. That somehow made it sweeter. Fueled by inspiration....I set up my camera and filmed a Khloe Kardashian inspired makeup look.

Want to see how it turned out? The products I chose? Then check out Mansa Fashion. YouTube channel. This was by far my favourite video ever to film - and my favourite finished product. If you have a chance, please take a look, like, comment, and subscribe!


Khloe Kardashian is such a beauty icon. She often inspires my fashion and makeup choices. I love that she is glamorous, polished, and always pushing the boundaries.

Who inspires you? Name a few of your beauty icons!

xo Shannon

Friday, October 23, 2015

YouTube: Birthday Makeup Tutorial


I can admit it. In the past, I was a total birthday brat. I wanted a big party with all of my friends.....a fun night out....an unforgettable time. The reasoning for this is simple. I am a twin so growing up I had to share all of my birthdays with my brother. That meant a joint cake and a joint birthday party. When I got a bit older I loved the idea of having a celebration that was mine and mine alone. So I started planning massive birthday dinners and club nights. Now? I have grown tired of trying to organize people. Which is why I have scaled back on my birthday this year.

My plans? To head over to my parents house for the day. My husband is unfortunately working during the day so I decided to spend time with family instead. I think we are going to have a movie day or catch up on some Netflix. Hopefully it will be nice and relaxing. After my husband gets off of work we will be going to dinner with the family (twin included), open presents, and eat some cake. Not a bad way to spend a day in my opinion! It will certainly be different than the last few years but I think that is a good thing.

Since my birthday is tomorrow I decided to film a YouTube video about it. It is a tutorial that features the makeup I plan to wear for my birthday dinner with family. I tried to create something that was pretty, polished, and just a little bit glam. Hopefully I succeeded! Take a look at Mansa Fashion. YouTube channel to see this video along with all of my others.


As you can see, my goal was to create birthday makeup that was fun yet put together. I used some of my favourite makeup products to boost my confidence and feel like a star on my big day. Overall, I had fun filming this and putting the look together. Hopefully I am as successful tomorrow!

Don't forget to check out Mansa Fashion. YouTube channel, comment, like, and subscribe. Your support means the absolute world to me.

What do you think of this makeup look? How do you celebrate your birthday?

xo Shannon

Wednesday, May 27, 2015

YouTube: Glowy Summer Makeup Tutorial


There is something exciting about that moment. When I finish editing a video and anxiously wait for it to upload. Honestly? I get a little nervous every time one goes live. So much goes into it all. Preparing, filming, and editing....and then bam! It is out there. Scary but thrilling. I had that feeling today. I filmed my very first makeup tutorial. After doing a few reviews, first impressions, and hauls, I finally felt ready to tackle something different. Which is why my latest YouTube video is a Glowy Summer Makeup Tutorial.

I absolutely love summer makeup. The glowy skin, the shimmery shadows, and the bold lip colours. Not to mention all of the bronzey shades. Love, love, love. That love of summer makeup is what inspired my first tutorial. I was about to get ready for a date night with my fiance and I thought, why not film it? So I did! I started to round up my favourite summer products - like my Tarina Tarantino eyeshadow palette, a super gorgeous and glowing baked blush from Hard Candy, and a gold toned highlight. Before I knew it, I had filmed my very first tutorial for Mansa Fashion. YouTube channel. Exciting!

On that note....I thought now would be the perfect time to share my YouTube video. Take a look, like, comment, and subscribe!


There you have it. The seventh video on my channel. I wonder if the thrill of a new video will ever wear off. Not so far! To check out some of my other videos, take a look at Mansa Fashion. YouTube channel. Be sure to let me know what you think of this makeup look....

Are you excited for summer? What do you think of this makeup tutorial?

xo Shannon

Wednesday, February 5, 2014

smokey eyeshadow: a step-by-step guide


One thing I get requests for? To do an eyeshadow tutorial. Makeup is my biggest passion and I am totally obsessed with a good smokey eye. (As you can probably tell from any of the makeup looks I post on this blog!) In fact, I wear one just about every single day. As much as I try to mix things up every now and then, smokey eye makeup is my go-to.

Since some of you requested a tutorial, I thought that I would do just that! Here is a step-by-step guide to achieving the perfect smokey eye.

1) Grab Your Tools


First thing is first - it's time to grab everything you need. That means an eyeshadow primer or base, eyeliner, mascara, and at least three eyeshadows. (Four is preferable but three will do just fine!) Things to keep in mind? Liquid eyeliner is great for a sharp and dramatic line. A kohl or gloss eyeliner is ideal if you want a look that is super smudgy and messy. When it comes to your eyeshadow shades, you'll need: one light shade, one medium shade, and one darker shade.

2) Put Down Your Base


The next step for a smokey eye? It's time to create a base. You can do this with an eyeshadow primer (the Too Faced Shadow Insurance is great, as is any of the primers from Urban Decay!) or a cream shadow, like the Maybelline Colour Tattoo, which is what I've used in the picture above. The key is to create a surface that your eyeshadows will stick to. It helps the colours look more vibrant and prevents creasing.

3) Apply Your Eyeshadow Shades


Now it's time to grab that shadow! For this look, I used a champagne shade from the Too Faced The Return of Sexy palette. All you have to do is use a fluffy brush to apply the colour all over the lid.
Then it's time to move onto your medium shade. Sticking with this quad, I used that grey colour and packed it on, starting from the center of the lid to the outer corner. When you do this, make sure you're blending the two colours together so it looks as natural as possible. 

Ready for a little extra drama? Grab a crease brush and use a dark shade, like black, deep brown, or maroon. The possibilities are endless! All you have to do is make sure this is the darkest shade you're using for the look. Put a little on your brush and apply it to the outer corner of your eye. Then blend it through the crease. You can build the colour up as much as you like to make the look super simple or super smokey. It is totally up to you. 

Take a medium brown shade on a large fluffy brush and blend out the shadow. You can also add a matte white shade underneath your brow bone and in the inner corner of your eye. Finish off the eyeshadow look by running the deepest shade along your lower lash line.

When the eyeshadow is finished, it should look something like this:


4) Add The Liner and Mascara


It's time to finish off the look! You can complete this smokey eye with some eyeliner and mascara. The type of eyeliner you use is totally up to you. As for myself, I love a good liquid liner with a bit of a cat-eye shape. It's a little bit bold but still totally sexy. For the mascara, make those lashes big and bold! My favourite mascara is the Benefit They're Real! but anything will do. Use two coats for the most impact or even add on some fake lashes if you'd prefer.

The rest of your makeup is totally up to you. A few tips? Make sure you have a good under eye concealer to offset the darkness of the eyes. Also, bronzed cheeks and a nude lip will really make those eyes pop!

5) The End Result....

After all is said and done, your smokey eyeshadow look should be dramatic and beautiful. Ready to see how mine turned out?


There you have it! That is my step-by-step smokey eyeshadow tutorial. Hopefully it can help some of you achieve your own smokey makeup look. If you happen to put this tutorial to use, be sure to post pictures or send me the link. I'd love to see how it turned out!

Do you love smokey eye makeup? What do you think of this tutorial?

xo Shannon

Wednesday, October 9, 2013

there are hundreds of bees in the purple clover.


There's something about Keira Knightley. Not only is she talented and beautiful, but she always looks stunning on a red carpet! A little while back, she completely wowed at her TIFF movie premiere. There was something about her makeup that made me positively speechless. The purple shade, the bold brows...perfection!

Here are a couple more pictures of her gorgeous gorgeous makeup:


Since I am totally in awe of her red carpet makeup, I thought I would attempt to re-create it. I really wanted to focus on that stunning purple eye shadow - I can't get enough of it! While I'm no Keira Knightly, I thought it was worth a shot!

My Keira inspired makeup look turned out something like this:


Products Used:
Cover Girl Cream Whipped Foundation, Rimmel Wake Me Up Concealer, Cover Girl Powder, Too Faced Return of Sexy Palette, Joe Fresh Stone Grey Eyeshadow, MUA Brown Eyeliner, Benefit They're Real! Mascara, NARS Deep Throat Blush, Maybelline Colour Whispers.

What do you think of Keira's red carpet makeup look?

xo Shannon

Tuesday, October 1, 2013

five minute makeup inspired by: miley cyrus


Love her or hate her, Miley Cyrus has got everyone talking. Her raunchy new look and sound is grabbing headlines all over the world. Whether that's a good thing or not still remains to be seen. But with a #1 single and a hotly anticipated new album, I'd imagine she's not complaining.

I'll admit - I've been a Miley fan since she was on Hannah Montana. Which is why when I saw the music video to Wrecking Ball for the first time, I thought more about the song than the fact that she was, well, naked on a wrecking ball. Another thing that struck me about the video? Her makeup. It was so simple, yet so powerful and striking. I knew the moment that I saw it that I wanted to re-create it. While subtle eyes and a bold lip isn't my go-to look, I couldn't resist. Not only is this makeup bold and striking....but it's super quick and easy!

So, before I go through the steps to creating this five minute makeup, here is my re-created Miley Cyrus Wrecking Ball look:


Products Used:
Rimmel Clean Finish Foundation, Rimmel Wake Me Up Concealer, 
Revlon Photo Ready Powder, Blinc Cosmetics Eyebrow Mousse, 
Urban Decay Naked Palette, Hard Candy Fox in a Box Blush, 
Benefit They're Real! Mascara.

Creating this look really is simple....honest! From start to finish it took me about five minutes. Here is how I did it:

I started by going through my normal foundation routine (moisturize, prime, apply foundation, apply concealer, and powder the face). Once that was done, I focused on the eyes. I used a matte eyeshadow just slightly darker than my natural skin colour all over the lid. Then I took a light shimmery shadow and applied that lightly on the brow bone and on the inner corner of my eyes.

Next, came the mascara. Since this was such a natural eye look, it really was all about the lashes. I applied two thick coats of mascara to get the length and thickness this look needs. On the cheeks, I dusted a very natural-looking peachy coloured blush just on the apples.

The real drama of this look comes from the lips! I went for a super bright and bold red lipstick shade. I used a red lip liner around my lips for a little more precision and then simply applied the red lipstick directly onto my lips.

And that was it! Creating this Miley Cyrus makeup look was really easy but it had just the right hint of drama. I definitely encourage you to give it a try!

What do you think of this Miley Cyrus inspired makeup look?

xo Shannon

Friday, August 2, 2013

khloe kardashian: makeup inspiration


As I mentioned in my recent post, I kind of have an obsession with Khloe Kardashian at the moment. I don't know exactly what it is, but I think she is amazing. Plus, she has ultra-glam makeup down pat! So, I decided to re-create one of her more memorable makeup looks.

This makeup look (pictured above) is super smokey, sexy, and glamorous. The Kardashian's are known for their stunning dark makeup looks, and Khloe is no different! This makeup look has winged out shadow, bronzed cheeks, and a nude lip. (Always a good look.) I totally fell in love with it and simply needed to try to recreate it.

Check out my Khloe Kardashian inspired makeup look:


Overall, I'm happy with how this look turned out. I love dramatic, smokey eye makeup looks, so this was right up my alley. It made me feel super sexy and confident - which is exactly what makeup should do. And I have Khloe to thank for inspiring me!

Products used for this makeup look were:

MAC Studio Fix Foundation, Urban Decay 24/7 Concealer, Cover Girl powder, Rimmel Bronzer, NARS the Multiple in South Beach, Sally Hansen Blush in Fawn, Kat Von D palette in True Romance, Eyeko London Liquid Eyeliner Pen, Dior Show Waterproof Mascara, Blinc Eyebrow Mousse, Maybelline Extreme Moisture Lipstick in Buttercup.

What do you think of this makeup look? Who has been inspiring you lately?

xo Shannon

Wednesday, June 19, 2013

i'm wonderstruck, blushing all the way home.


Every so often, I find myself completely enamored with a celebrity makeup look. This is one of those times. Taylor Swift attended (and won best celebrity fragrance!) the 2013 Fragrance Foundation Awards in New York City last week and she looked flawless. Her makeup was truly perfection. She played with colour in a subtle and classy way, blending rust and turquoise together on the eyes and finishing the look off with a pretty peach lip.

The moment I saw Taylor's makeup, I knew that I wanted to take a stab at re-creating it. I started by applying a shimmery champagne colour all over the lid and blending out the sides with a deep blue. I applied Taylor's signature black cat-eye liner and blended out the shadows with a rust coloured shadow. After that, I ran a bright turquoise shade along the lower lash line and applied a coat of mascara to my upper and lower lashes. Then it was more lashes, lashes, lashes! I put on some falsies, used a neutral blush, and finished off the look with a peach lipstick.

How did it turn out? Well, this was my finished product! It's not exactly like Taylor's makeup look, but I definitely was inspired by it! Overall, I'm happy with how it turned out. Plus, it felt nice to get creative and play around with makeup.


What do you think of this makeup look? Do you love Taylor Swift's red carpet makeup as much as I do?

xo Shannon

Wednesday, January 16, 2013

makeup tutorial: christina aguilera

A little while ago, I posted about Christina Aguilera's "Your Body" music video. A bunch of you requested that I do a makeup tutorial on one of the looks, so today I am doing just that!

I love the makeup in this music video. The styling was perfectly retro and actually quite easy to do. So if you're looking for something sexy, bold, and quick, this makeup is right up your alley. Here is the look I decided to recreate.

Now it is time to recreate Christina's amazingly retro makeup!

What do you think of Christina's makeup? Would you ever wear this?

xo Shannon

Saturday, November 19, 2011

makeup tutorial: classic kristen stewart purple and black smokey eye


People either love or hate Twilight. Personally, I love it. I love how dramatic and over the top everything is. I love being on Team Jacob. Yet, I love the idea of a love so intense between Bella and Edward. Basically, the only thing I care about at the moment, is Twilight: Breaking Dawn - Part 1.

In a few hours, I will be seeing the movie! To ease my anxious excitement, I have decided to do a Kristen Stewart makeup tutorial. The look I am recreating, is from the premiere of Eclipse. This is actually my favourite makeup look from Kristen! I love the combination of that vibrant purple and black. The look is smokey, sexy, and beautiful.

Saturday, October 22, 2011

makeup tutorial: cassie blake (the secret circle)


Let me cut to the chase: "The Secret Circle" is awesome.

From the first episode, I have been hooked. It is quickly becoming one of my favourite new shows! Every episode I watch, I am always in love with main character, Cassie's makeup. It is simple, wearable, but so pretty. So, I decided to do a quick tutorial on it! This look is really easy to do, but very pretty.

Monday, September 19, 2011

mini-makeup tutorial: britney spears


Today, I decided to recreate a Britney Spears makeup look! I immediately fell in love with this look, from the dress Britney wore, (the colour!) and her flawless makeup. I love that it ties in the colour of the dress, but doesn't look too matchy-matchy.

Saturday, September 3, 2011

makeup tutorial: sucker punch


I watched Sucker Punch a few weeks ago. I know this is probably old news, by oh my goodness, the makeup! I loved the movie itself - visually it simply beautiful. The film was dark, dramatic and daring. However, the entire movie, I could not stop admiring Baby Doll's makeup. It was dramatic, but beautiful. It captured the characters innocence, but still looked sexy.

Friday, August 26, 2011

makeup tutorial: bella vida


If you watched the prematurely canceled ABC Of Tourism show, Huge, you know Hayley Hasselhoff as the sweet but complex, Amber. If you didn't watch, you probably knows her as David Hasselhoff's daughter. Hayley and her sister, Taylor, make up the music duo Bella Vida.

Tuesday, August 16, 2011

makeup tutorial: emma stone - the help premiere


Emma Stone has been all over the big screen this summer. Presently, she has three movies in theaters. Impressive! Even more impressive, is her red carpet makeup. Emma consistently captures simple, chic, and wearable style. She showcased this most recently, at the premiere of her latest movie, The Help. Emma's makeup is flirty, pretty, and simple. Here is how to recreate this red carpet look.

Sunday, August 7, 2011

katy perry makeup tutorial.


Katy Perry looked flawless at the premiere for The Smurfs. Not only did she don a white Smurfette sequined dress, but her makeup was amazing. A sultry combination of drama and fun, Katy rocked the premiere. This look is pretty dramatic, but it's also really cute! So if you're going out, consider giving this look a try.

Thursday, July 28, 2011

orange/yellow 60s inspired makeup.


I came across this picture and fell in love with the makeup. The look is both classic and vibrant. So, if you want to add a pop of colour without going too dramatic, this is definitely a look you are going to want to try! After seeing this picture, I starting going through my makeup collection to find the right colours for this look, and came across a NYC duo that is absolutely perfect.

Tuesday, July 26, 2011

simple. classic. audrey.


This is one of my favourite hairstyles to do, mostly because it is quick, simple, and looks great! All you'll need is a hair straightener or curling iron, whichever you prefer.

Tuesday, July 12, 2011

audrey hepburn makeup.


My fashion icon is Audrey Hepburn, without a doubt. She embodied such poise, class, grace and spirit. It is no wonder that new generations continue to fall in love with her. The inspiration for this makeup look comes from my all-time favourite picture of Audrey. Her makeup is flawless, fun, and embodies her beautiful energy.
'},hasCustomJumpLinkMessage:!1,jumpLinkMessage:'Read more',pageType:'index',searchLabel:'tutorials',pageName:'tutorials',pageTitle:'Mansa Fashion.: tutorials'}},{name:'features',data:{}},{name:'messages',data:{edit:'Edit',linkCopiedToClipboard:'Link copied to clipboard!',ok:'Ok',postLink:'Post Link'}},{name:'template',data:{name:'Ethereal',localizedName:'Ethereal',isResponsive:!1,isAlternateRendering:!1,isCustom:!1,variant:'hummingBirds2',variantId:'hummingBirds2'}},{name:'view',data:{classic:{name:'classic',url:'?view=classic'},flipcard:{name:'flipcard',url:'?view=flipcard'},magazine:{name:'magazine',url:'?view=magazine'},mosaic:{name:'mosaic',url:'?view=mosaic'},sidebar:{name:'sidebar',url:'?view=sidebar'},snapshot:{name:'snapshot',url:'?view=snapshot'},timeslide:{name:'timeslide',url:'?view=timeslide'},isMobile:!1,title:'Mansa Fashion.',description:'',url:'https://mansafashion.com/search/label/tutorials',type:'feed',isSingleItem:!1,isMultipleItems:!0,isError:!1,isPage:!1,isPost:!1,isHomepage:!1,isArchive:!1,isSearch:!0,isLabelSearch:!0,search:{label:'tutorials',resultsMessage:'Showing posts with the label tutorials',resultsMessageHtml:'Showing posts with the label tutorials'}}}]),_WidgetManager._RegisterWidget('_NavbarView',new _WidgetInfo('Navbar1','navbar',document.getElementById('Navbar1'),{},'displayModeFull')),_WidgetManager._RegisterWidget('_HeaderView',new _WidgetInfo('Header1','header',document.getElementById('Header1'),{},'displayModeFull')),_WidgetManager._RegisterWidget('_BlogView',new _WidgetInfo('Blog1','main',document.getElementById('Blog1'),{cmtInteractionsEnabled:!1,navMessage:'Showing posts with label tutorials. Show all posts',lightboxEnabled:!0,lightboxModuleUrl:'https://www.blogger.com/static/v1/jsbin/1666805145-lbx.js',lightboxCssUrl:'https://www.blogger.com/static/v1/v-css/13464135-lightbox_bundle.css'},'displayModeFull')),_WidgetManager._RegisterWidget('_ProfileView',new _WidgetInfo('Profile1','sidebar-right-1',document.getElementById('Profile1'),{},'displayModeFull')),_WidgetManager._RegisterWidget('_HTMLView',new _WidgetInfo('HTML1','sidebar-right-1',document.getElementById('HTML1'),{},'displayModeFull')),_WidgetManager._RegisterWidget('_ImageView',new _WidgetInfo('Image1','sidebar-right-1',document.getElementById('Image1'),{resize:!0},'displayModeFull')),_WidgetManager._RegisterWidget('_FollowersView',new _WidgetInfo('Followers1','sidebar-right-1',document.getElementById('Followers1'),{},'displayModeFull')),_WidgetManager._RegisterWidget('_ImageView',new _WidgetInfo('Image2','sidebar-right-1',document.getElementById('Image2'),{resize:!0},'displayModeFull')),_WidgetManager._RegisterWidget('_ImageView',new _WidgetInfo('Image6','sidebar-right-1',document.getElementById('Image6'),{resize:!0},'displayModeFull')),_WidgetManager._RegisterWidget('_ImageView',new _WidgetInfo('Image3','sidebar-right-1',document.getElementById('Image3'),{resize:!0},'displayModeFull')),_WidgetManager._RegisterWidget('_ImageView',new _WidgetInfo('Image4','sidebar-right-1',document.getElementById('Image4'),{resize:!0},'displayModeFull')),_WidgetManager._RegisterWidget('_LabelView',new _WidgetInfo('Label1','sidebar-right-1',document.getElementById('Label1'),{},'displayModeFull')),_WidgetManager._RegisterWidget('_PopularPostsView',new _WidgetInfo('PopularPosts1','sidebar-right-1',document.getElementById('PopularPosts1'),{},'displayModeFull')),_WidgetManager._RegisterWidget('_BlogArchiveView',new _WidgetInfo('BlogArchive1','sidebar-right-1',document.getElementById('BlogArchive1'),{languageDirection:'ltr',loadingMessage:'Loading…'},'displayModeFull')),_WidgetManager._RegisterWidget('_AttributionView',new _WidgetInfo('Attribution1','footer-3',document.getElementById('Attribution1'),{},'displayModeFull')),_WidgetManager._RegisterWidget('_StatsView',new _WidgetInfo('Stats1','footer-3',document.getElementById('Stats1'),{title:'stats.',showGraphicalCounter:!1,showAnimatedCounter:!1,showSparkline:!1,statsUrl:'//mansafashion.com/b/stats?style=BLACK_TRANSPARENT&timeRange=ALL_TIME&token=APq4FmCl60AL1FZytRf_S42D0KxhmioaTIjNUdRC-m9lSJECEx6r6vy5GHIaZUp4ON0nAi5WQrfUML8hjEi_tbcU_s0X4-auNQ'},'displayModeFull'))